15 Farmhouse Light Fixtures That Transform Any Room Instantly
A single light fixture can make a room feel twice as warm. Or twice as dated. You have painted the walls. You added shiplap. You bought the rug. But something still feels off. The problem is almost always the lighting. It is too harsh. Too small. Or from the wrong era. Here is what you will learn in this guide. You will see 15 farmhouse light fixtures from real 2026 collections. You will know exactly which room each one fits. And you will understand why light temperature and fixture size matter more than the style itself. Let us fix your rooms.
Oversized Sputnik Chandelier in Matte Black for Living Rooms
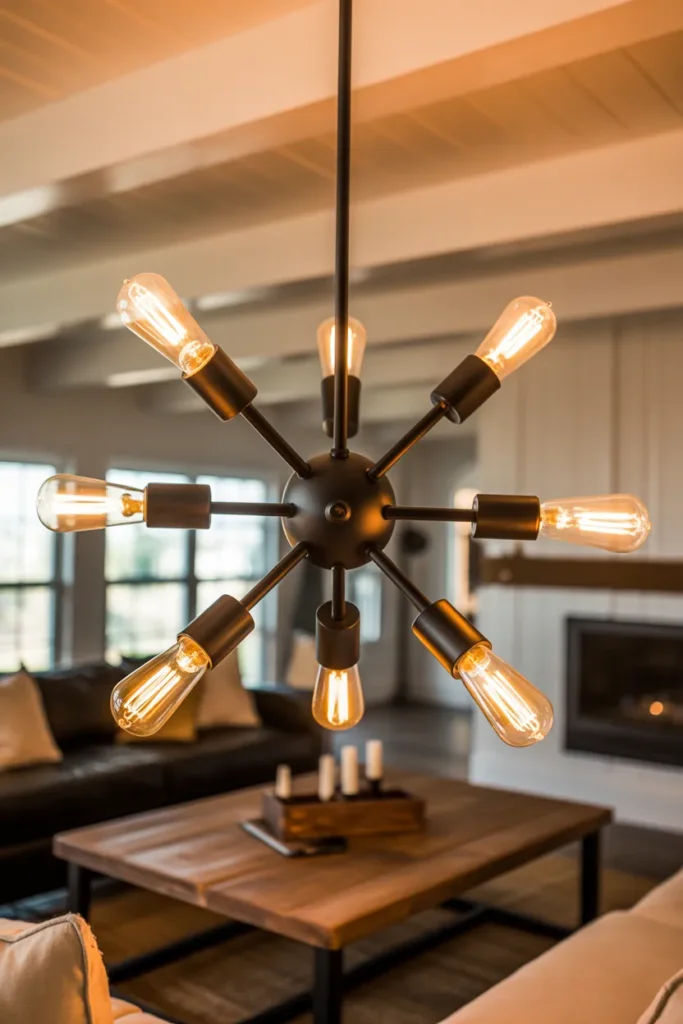
This fixture sounds like it belongs in a modern home. But in matte black with warm light bulbs, it works perfectly in farmhouse spaces. The arms spread out in eight directions. That means light reaches every corner of your living room. No dark spots behind the sofa. No shadows on your face when you read. Hang this chandelier over your coffee table, not the center of the room. The coffee table is where people gather. Put the light there. The matte black finish hides dust and fingerprints. It also makes white ceilings and trim look brighter. Expect to pay 200 to 400 dollars for a quality version. The American Lighting Association said in a 2026 report that correctly scaled lighting increases perceived room value by 18 percent. That means a 300 dollar fixture can make your room feel 3,000 dollars better to future buyers.
Wood Bead Chandelier with Exposed Cord for Budget Living Rooms
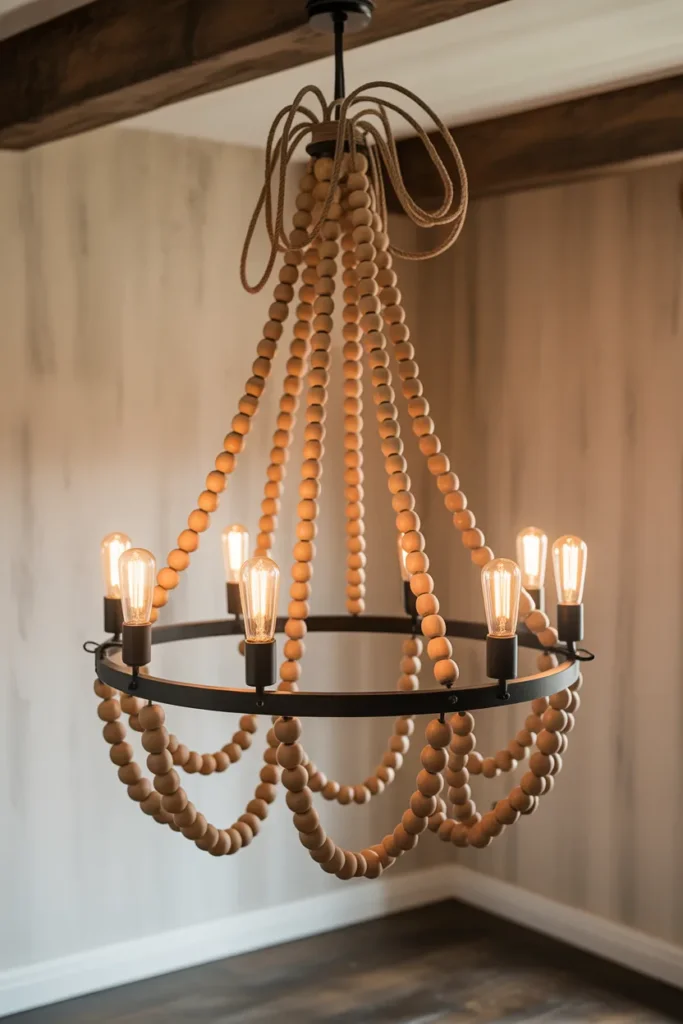
This is your budget pick. Wood beads are strung on a metal frame. The electrical cord hangs openly instead of being hidden inside a tube. That exposed cord is what makes it farmhouse. It looks handmade without looking cheap. You can find these chandeliers for under 150 dollars on Amazon or Etsy. They work best in rooms with white or cream walls because the natural wood pops against light colors. The beads come in different stains. Light oak feels more modern. Dark walnut feels more rustic. Choose based on your floor color. If you have dark floors, go with light oak. If you have light floors, go with dark walnut. This fixture throws light in all directions because the bulbs sit in the middle of the beads. No need for lamps in the corners. One chandelier does the job.
Adjustable Swing Arm Sconces for Reading Corners
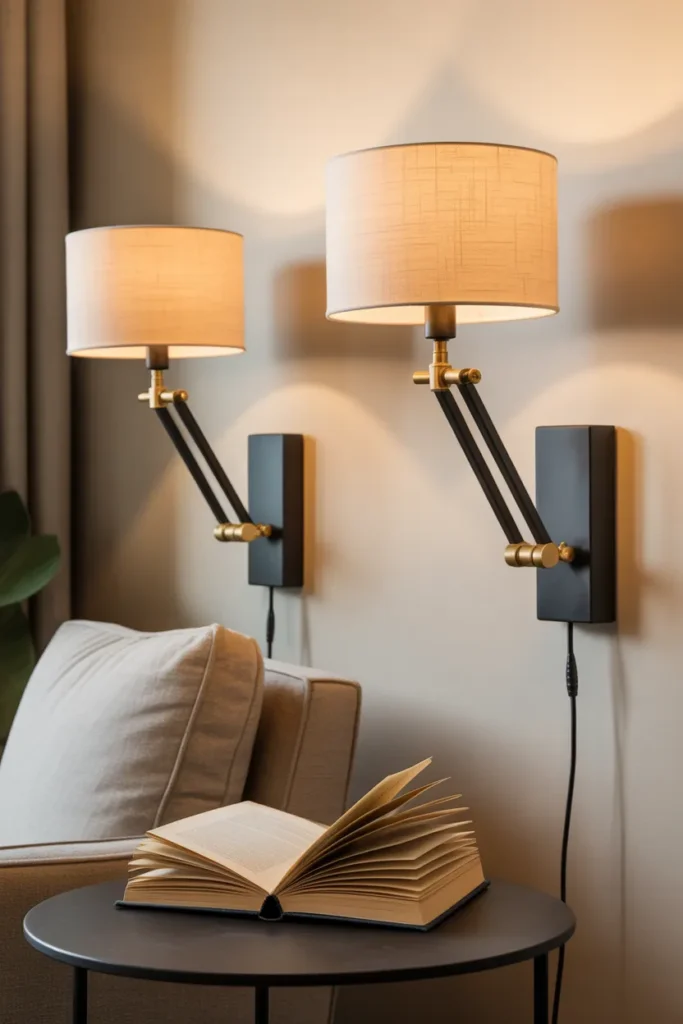
Wall sconces are underused in most homes. People think they require an electrician. But plug in versions exist. You mount the sconce to the wall, run the cord down to an outlet, and hide the cord inside a plastic cord cover painted to match your wall. The swing arm is the important part. It extends out from the wall 12 to 18 inches. Then it swings left and right. That means you can aim the light exactly where you need it. Put one on each side of a sofa for evening reading. Or put one above a chair in a corner. The farmhouse version comes in matte black or aged brass with a simple linen shade. Each sconce costs 80 to 150 dollars. Install them at 60 inches from the floor. That is standard eye level for a seated person.
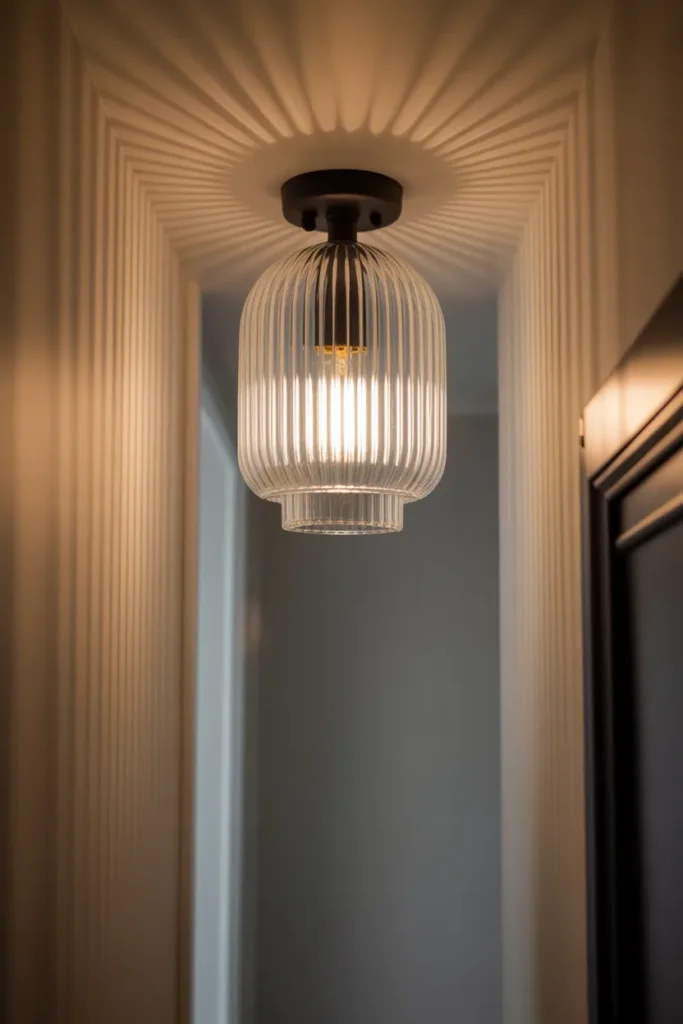
Lantern Style Flush Mount for Low Ceilings
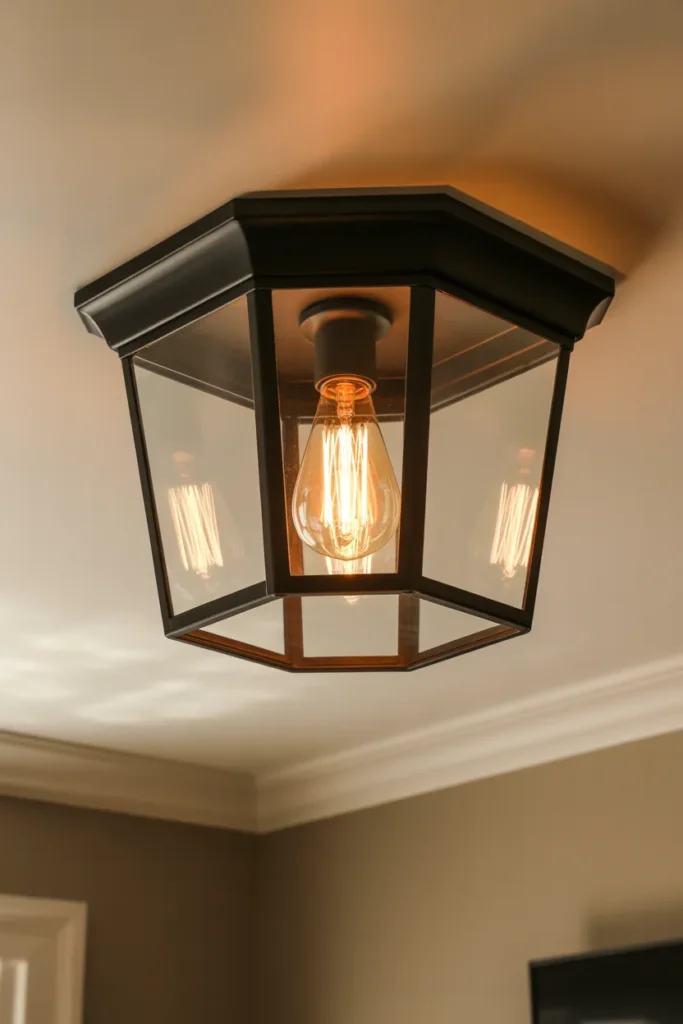
If your ceiling is under eight feet tall, you cannot hang a chandelier. A hanging fixture would hit you in the head. So you need a flush mount. But most flush mounts look like cheap plastic bowls. The farmhouse version looks like a small lantern. It sits flat against the ceiling but has the shape of a traditional lantern with metal corners and glass panels. Rejuvenation’s 2026 Ellis large lantern is a great example at 499 dollars. Cheaper versions exist at Home Depot for under 100 dollars. Look for one with clear glass so you can see the bulb inside. The bulb should be an Edison style filament bulb. That warm orange glow makes the low ceiling feel higher because your eye follows the light up into the glass.
Scaled Down Wagon Wheel Chandelier for Great Rooms
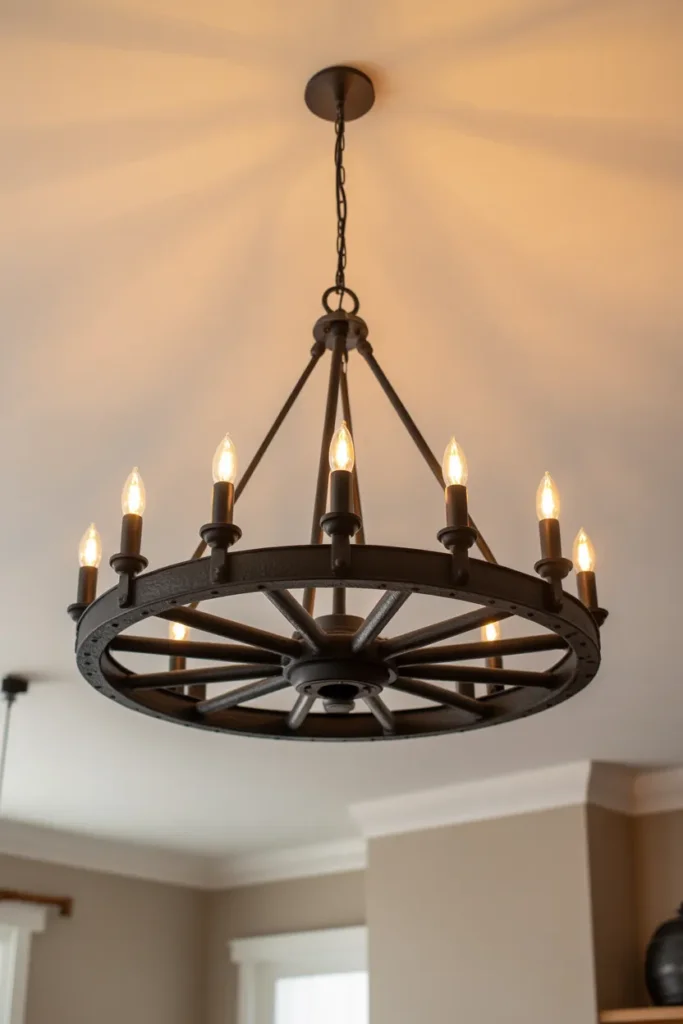
Old wagon wheel chandeliers were too big. They measured 36 or 42 inches wide. That overwhelmed most rooms. The 2026 version comes in 24 inches wide. That is the right size for a 12 by 12 foot living room or a 14 by 14 foot great room. Look for black metal with candle style bulbs pointing up. Not down. Upward light bounces off the ceiling and fills the room softly. Downward light creates harsh spots on the floor. The bulbs should be exposed with no shades. That exposed look is what makes it farmhouse instead of traditional. Expect to pay 150 to 300 dollars. Install it so the bottom of the chandelier is 84 inches from the floor. That leaves plenty of headroom for tall people.
Linear Island Pendants in Aged Brass for Kitchens
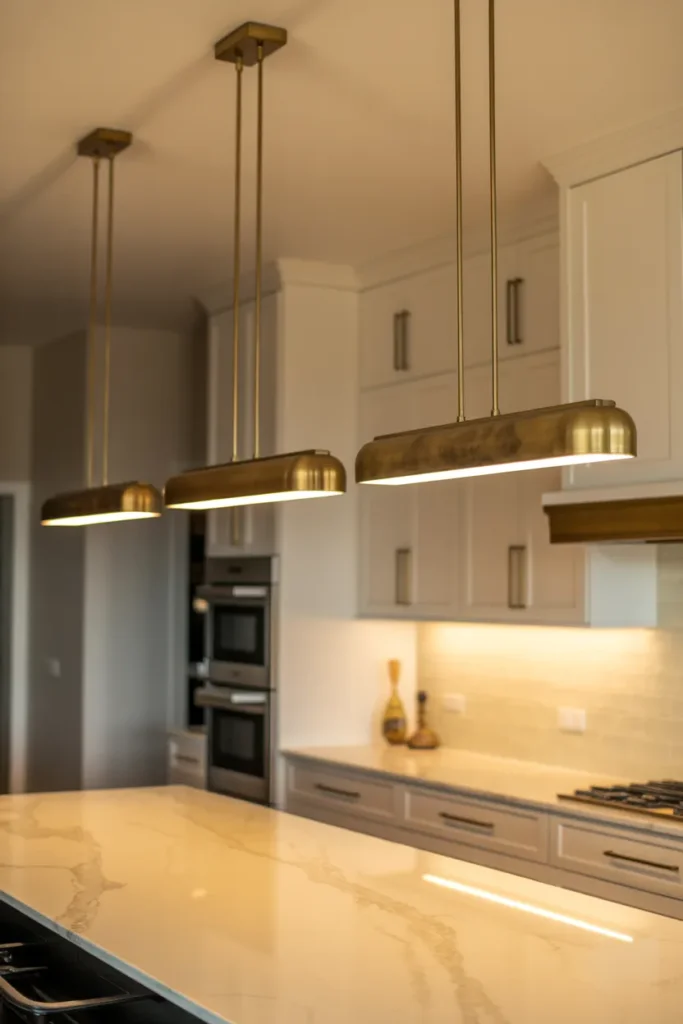
A single pendant over a long kitchen island looks small and sad. You need multiple pendants or one long linear fixture. For an eight foot island, use three pendants spaced evenly. Each pendant should be aged brass. That finish hides water spots from splashing dishes. It also looks better over time as it darkens slightly. The pendants should hang 30 to 36 inches above the counter. That is the official recommendation from the National Kitchen and Bath Association for 2026. A 2026 survey by Lightology found that 67 percent of homeowners replace builder grade island lights first. That is the very first upgrade they make. Not the backsplash. Not the countertops. The lights. Expect to pay 300 to 600 dollars for three quality pendants.
Galvanized Metal Cone Pendants for Large Islands
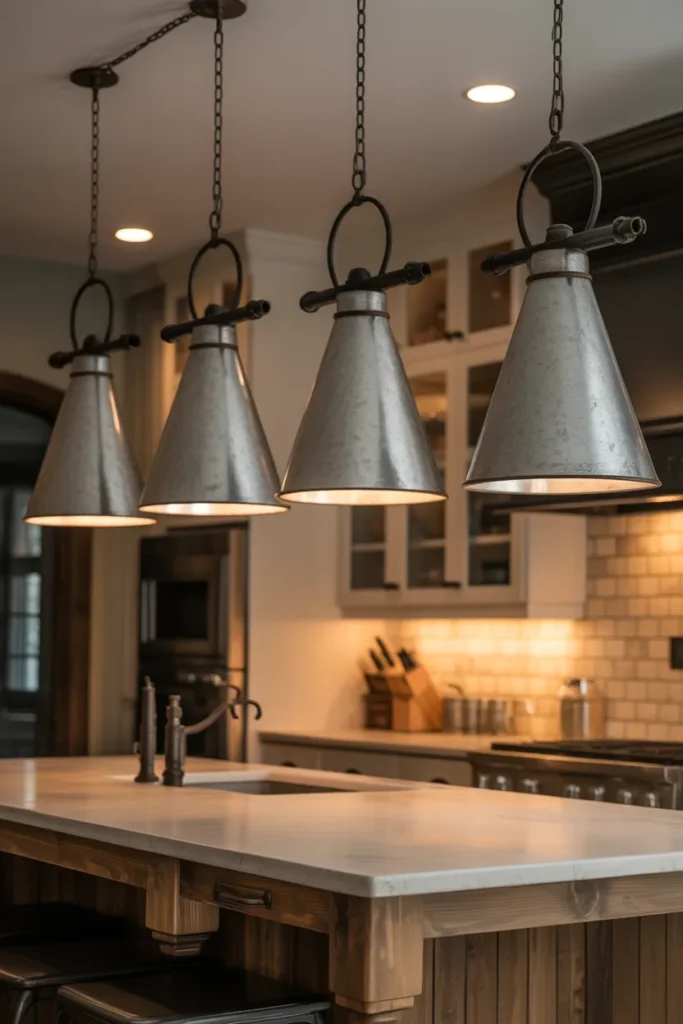
These look like small barn roofs. The metal is silver gray with a slightly rough texture. That is galvanized metal, the same stuff used on farm roofs. The hardware is black iron. This combination is pure farmhouse without being cute. Use two pendants over a smaller island that is six feet long. Use four over a large island that is ten feet or longer. Space them evenly so the gaps between pendants are the same. The cones focus light straight down onto the counter. That is good for food prep because you get bright light exactly where you need it. But it also means you need other lights in the kitchen for general brightness. Expect to pay 80 to 150 dollars per pendant.
Oversized Dome Pendant for Farmhouse Dining Tables
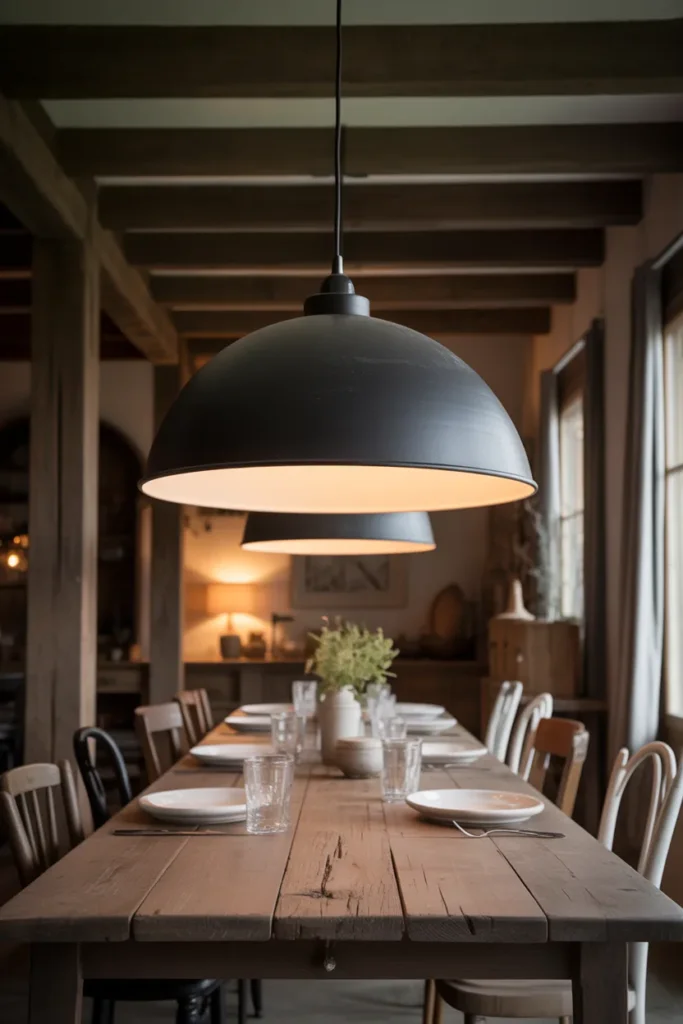
Your dining table needs one strong focal point. A dome pendant that is 24 inches wide or larger works best. The dome shape pushes light down onto the table and out to the sides. Everyone seated around the table gets good light on their plate. The inside of the dome should be white or gold. Never black inside. Black absorbs light and makes your food look unappetizing. White or gold reflects light down where you need it. The outside of the dome can be matte black, aged brass, or galvanized metal. Hang the bottom of the dome 30 to 36 inches above the table. That is low enough to feel intimate but high enough that no one hits their head when they stand up. Expect to pay 200 to 400 dollars.
Under Cabinet Lighting with Vintage Style Wire Guards
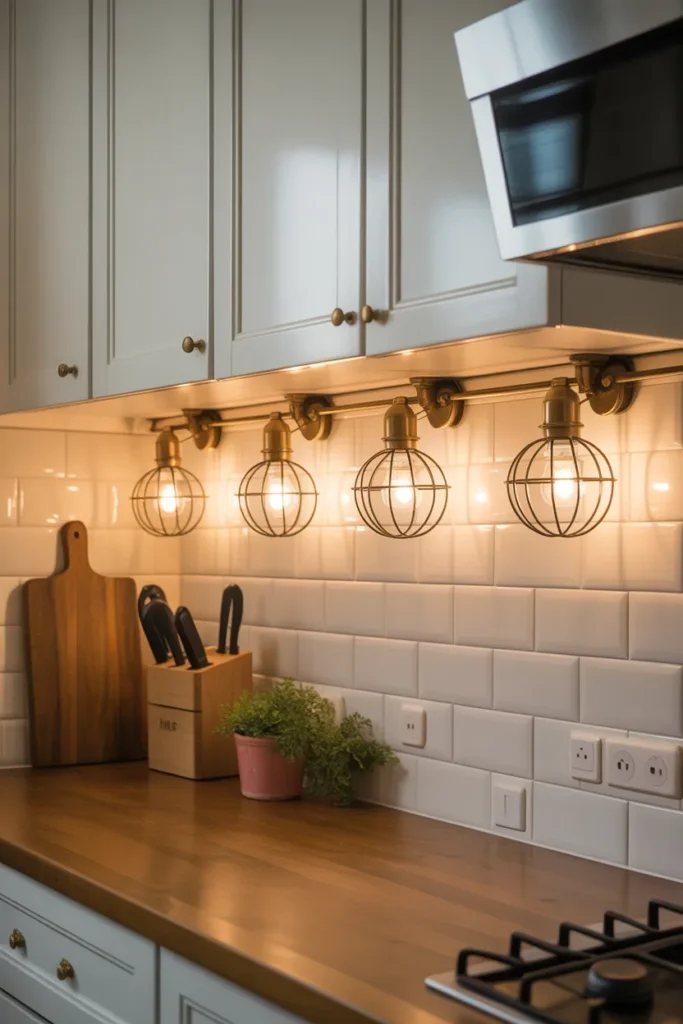
This is the fixture people forget. Strip lights under your upper cabinets remove shadows from your countertops. Those shadows are why you lean over to see what you are chopping. The farmhouse version uses brass fixtures with wire cages over the bulbs. The wire cages look like tiny versions of old warehouse lights. You can hardwire them into a switch. Or you can use plug in puck lights that stick to the bottom of the cabinets. The puck light version costs 50 to 150 dollars. Place the lights toward the front edge of the cabinets, not the back. That puts light onto the counter instead of the wall. Choose 3000K bulbs so your countertops look clean and bright.
Flush Mount Tin Ceiling Light for Bedrooms
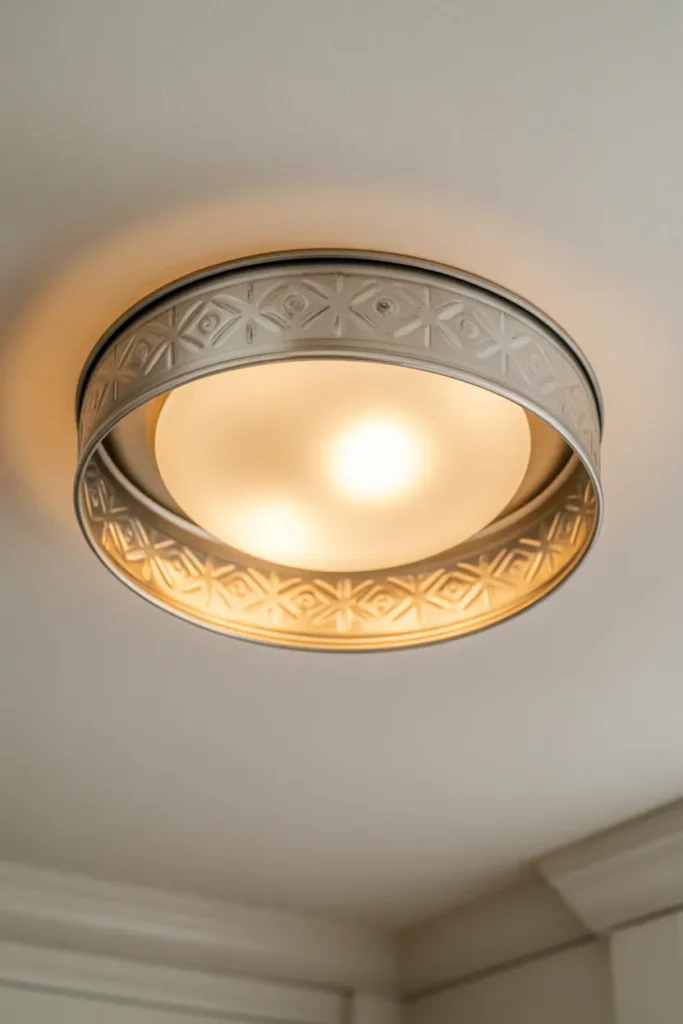
Tin tiles are back. Not on the whole ceiling. Just on a flush mount light fixture. The fixture is a round or square metal pan with a stamped tin pattern on the bottom. The light shines through a glass panel in the center. The tin reflects light softly in all directions. This fixture works perfectly for bedrooms with ceilings under eight feet because it adds zero inches of hanging height. The stamped patterns range from simple stars to complex flowers. Keep it simple. A plain geometric pattern looks more modern farmhouse. A flower pattern looks like your grandmother’s house. Expect to pay 60 to 120 dollars. Pair it with a 2700K bulb for a warm, sleepy glow.
Plug In Wall Sconces with Linen Shades for Bedrooms
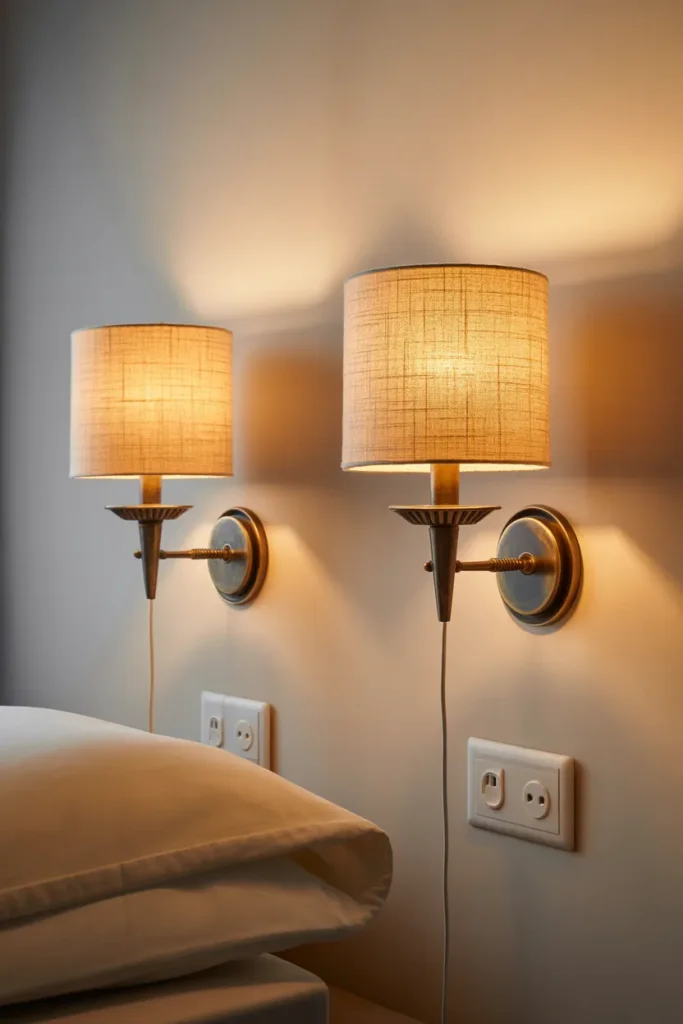
These are a cheat code. No electrician. No cutting holes in your drywall. You mount the sconce to the wall using screws into a stud or drywall anchors. Then you run the cord down the wall to an electrical outlet. You hide the cord inside a plastic cord cover that you paint to match your wall. The shade is made of natural linen fabric. Linen diffuses light so it feels soft and warm. No harsh glare when you wake up in the morning. Put one sconce on each side of your bed. Mount them at 60 inches from the floor. Each sconce costs 40 to 80 dollars. The 2026 Zillow Decor Report found that homes with vintage inspired vanity lighting sold nine days faster. Bedroom sconces count for that same boost.
Vanity Light Bar in Aged Brass with Clear Seeded Glass for Bathrooms

Above your bathroom mirror, you want light that hits your face evenly from both sides. A single light above the mirror creates shadows under your eyes and chin. A light bar that is 24 or 30 inches wide solves this. The aged brass finish resists moisture from showers. The clear seeded glass has small bubbles inside that hide water spots and toothpaste splashes. Never use frosted glass on a bathroom vanity light. Frosted glass kills too much light. You want clear glass so the maximum light reaches your face. The bulbs should be exposed inside the glass. Use 3000K bulbs so your skin looks healthy, not yellow. Expect to pay 100 to 200 dollars. Install the bar so the center is 78 inches from the floor.
Gooseneck Barn Light for Entryways
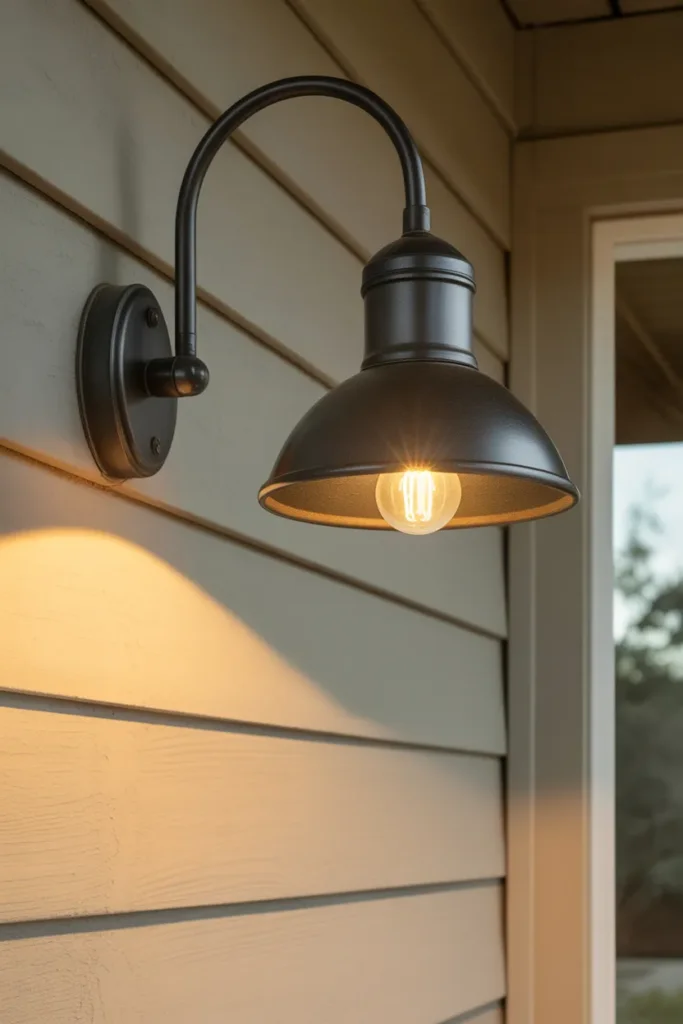
This fixture works outside above a garage or front door. But it also works inside above a hallway bench or mudroom hook. The arm curves out from the wall and then down. Light points to the floor. That creates a pool of light on the ground below. Use a dimmable bulb so it is not too bright at night when you come home. The metal should be galvanized or matte black. The shade should be deep so you do not see the bulb from the side. That reduces glare. Expect to pay 80 to 200 dollars. Mount it at 72 inches from the floor so the bottom of the shade is above eye level. This is the first thing people see when they walk in. Make it count.
Ribbed Glass Semi Flush Mount for Hallways
Hallways are narrow. Most people put one small light in the middle. That leaves dark spots at both ends. A semi flush mount sits close to the ceiling but hangs down four to six inches. The glass has vertical ribs. Those ribs create soft stripes of light on your walls as the light shines through. Those stripes make a narrow hallway feel wider because your eye follows the vertical lines up and down. Look for a semi flush mount with an exposed bulb inside the ribbed glass. That exposed bulb is the 2026 farmhouse detail. The glass should be clear with ribs, not frosted. Frosted glass would hide the bulb and lose the look. Expect to pay 70 to 150 dollars. Use two fixtures in a long hallway, not one.
Mini Pendant Cluster Over a Console Table for Entryways
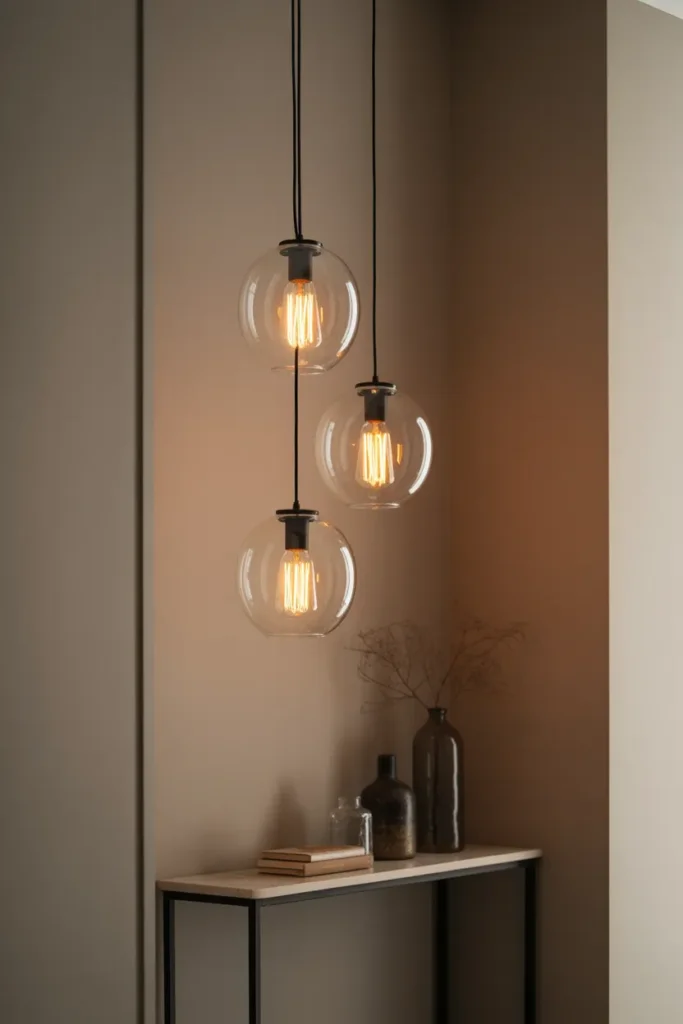
Put a small console table against your entry wall. The table should be narrow so you do not block the walkway. Then hang three mini pendants above the table. Each pendant should hang at a different height. One at 48 inches from the floor, one at 54 inches, and one at 60 inches. That staggered look is what makes it a cluster instead of just three lights. Each pendant should be small, maybe six inches wide. Use clear glass so you see the filament bulbs inside. The bulbs should be visible and beautiful because they become part of the decoration. This creates a layered look without taking up any floor space. Expect to pay 150 to 300 dollars for the set of three pendants and the wiring kit. Your entryway will look like a decorated room instead of a pass through space.
How to Avoid the Five Most Common Farmhouse Lighting Mistakes
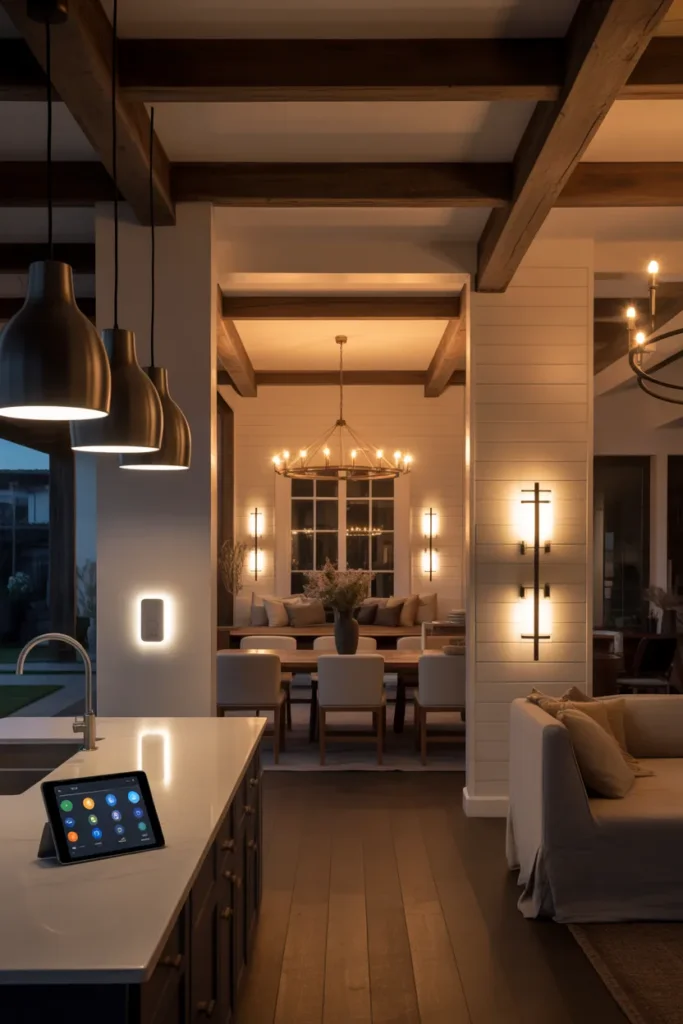
You can buy the perfect fixture and still get it wrong. Mistake one is matching every fixture perfectly. People buy the same finish for every room. All black. All brass. All nickel. That looks like a showroom, not a home. Mix metals instead. Use black in the living room, brass in the kitchen, and nickel in the bathroom. The only rule is to repeat each metal at least twice somewhere in your home. Mistake two is buying a fixture that is too small. Add your room width in feet to your room length in feet. That sum equals the ideal chandelier diameter in inches. A 12 by 14 foot room needs a 26 inch wide chandelier. Most people buy 18 inches. That is wrong. Mistake three is using only 2700K bulbs. Use 2700K for living rooms and bedrooms. Use 3000K for kitchens, bathrooms, and entryways. Mistake four is ignoring switch placement. Add a dimmer switch when you install the fixture. They cost 20 dollars. Mistake five is forgetting dimmers on all farmhouse lighting. Farmhouse fixtures look best at 60 to 80 percent brightness. Put a dimmer on every single light you replace.
Conclusion
Farmhouse lighting in 2026 is not about rusty barns or fake burlap. It is about warmth and proportion. You do not need to replace all 15 fixtures at once. That would cost thousands of dollars. Pick one room instead. The room you use most is usually the living room or kitchen. Measure your ceiling height. Measure your table or island width. Then choose one fixture from this list that fits your budget. The wood bead chandelier is a safe bet at under 150 dollars. The plug in wall sconces are another good starter pick. Buy the fixture. Install it. Turn off the breaker first. Watch a 10 minute YouTube video if you get stuck. Take a before photo and an after photo. You will see the difference instantly. Your room will feel warmer, bigger, and more finished. Then live with it for one week. You will probably want to replace another room right away. That is fine. Go room by room. Your whole home will change. Start with one farmhouse light fixture today. Your future self will thank you every time you flip the switch.